Skip to main content


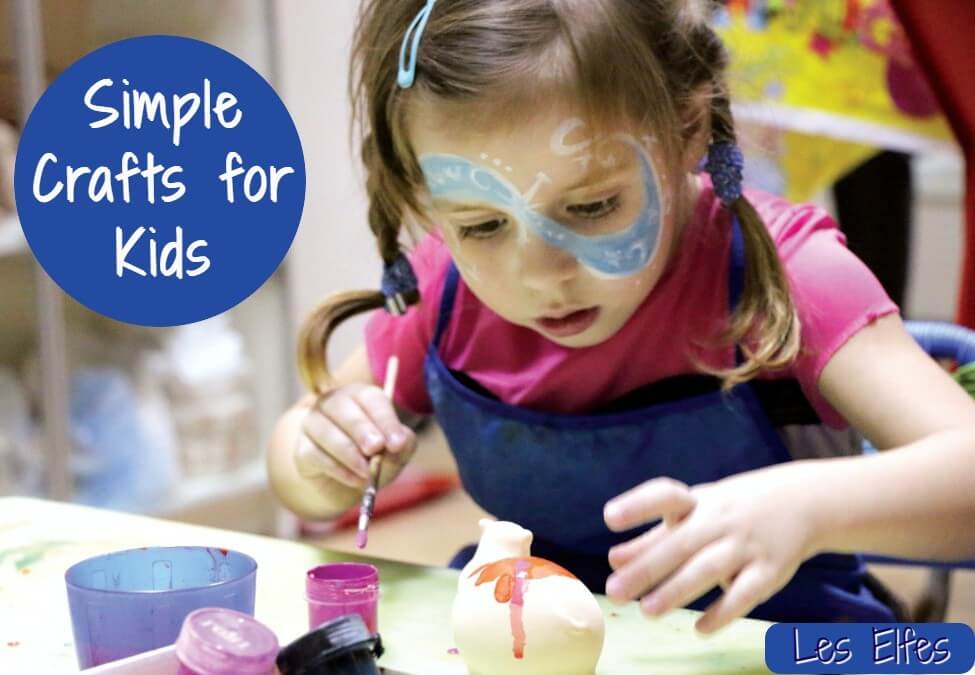
Crafts for kids are some of the simplest methods you can use to keep your kids busy and engaged. Further, craft projects help children improve their fine motor skills. Day crafts can be cost-effective yet fun. You can even use readily available materials in your home. In this article, we shall discuss easy craft ideas for kids of all ages.
Summer Craft Ideas
Whether you have preschoolers or older kids, these fun summer craft ideas will keep your little ones occupied.
Homemade Play Dough
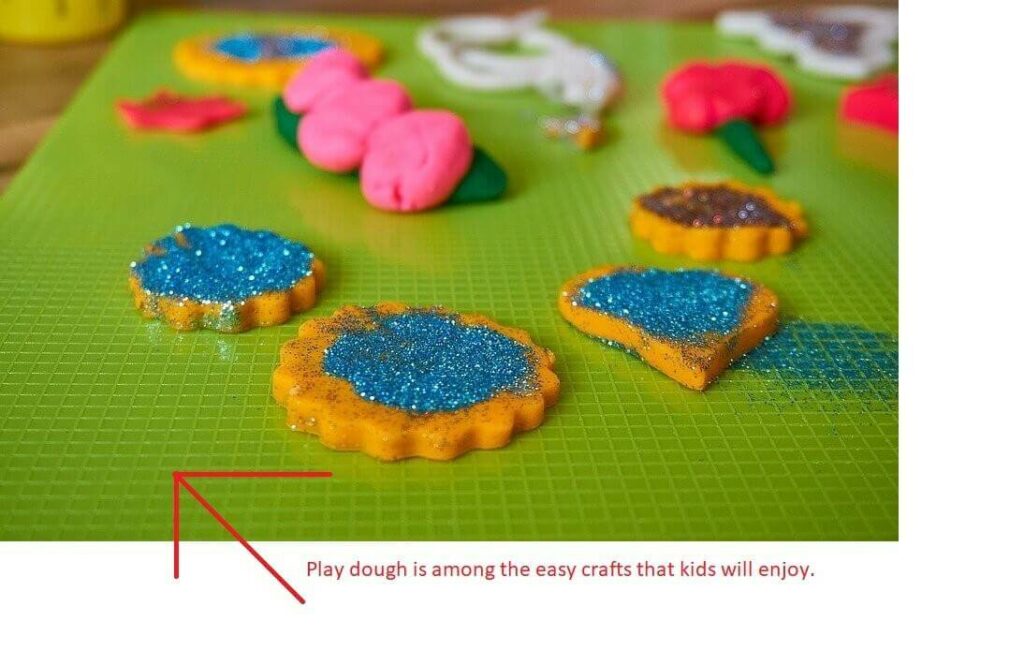
Play dough is among the easy crafts that kids will enjoy. Making the dough from home helps you understand the ingredients, and you can even customize it depending on your preferences. For example, you can add sparkles, color, essential oils, or natural flavors.
You can make different items from the play dough, depending on your preferences. You can even help your child in creating Halloween craft. Further, it features a handprint element that makes it more adorable. Read the following step by step guide to understand how to make DIY play dough.
Materials you will need
- Two cups of all-purpose flour
- Two tablespoons of oil. You can use vegetable, coconut, or baby oil
- Two tablespoons of cream of tartar
- Three quarter cup of salt
- Gel food coloring. You can skip this ingredient
- Between 1 and 2 cups of boiling water
- Some drops of glycerin to give the end product some shine and stretch
Method
- Put your flour, cream of tartar, salt, and oil in a mixing bowl and mix well
- Add your food coloring to the boiling water before pouring it into the flour mixture. Remember, you should add the water little by little until you achieve your desired consistency
- Stir your mixture continuously until you get a sticky consistency
- Add your glycerin and let your dough cool
- Take your dough out of the bowl and place it on a kneading board
- Knead the dough vigorously until it is no longer sticky. The kneading process is the most critical, and you should continue kneading your dough until you get the right consistency.
- If your dough is still sticky, add some flour until you are satisfied with the outcome.
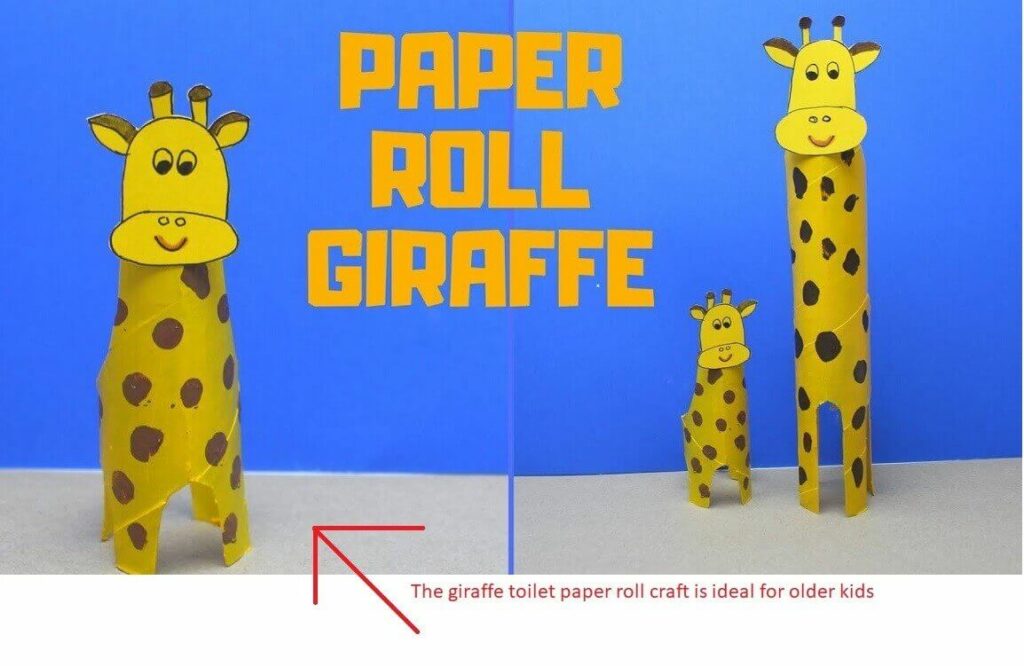
Giraffe Toilet Paper Roll Crafts
Things you will Need
- Two tissue paper rolls in different sizes
- Glue
- Five sheets of A4 paper. You can paint a plain paper using yellow acrylic paint, or use yellow paper
- Scissors
- Brush
- Hot glue
- Pink, brown, and yellowish-orange acrylic paint
- Googly eyes
- White cardstock
- Five brown and two black chenille sticks
Method
- Cut a third of your small toilet paper roll
- Cut two-thirds of your big tissue paper roll into half
- Pick one half and smear some glue on one side before joining the two sides together
- Smear some glue on all the three toilet paper rolls and bundle them together in white cardstock
The Tongue
- Cut out a tongue-shaped piece from your remaining paper rolls
- Paint the tongue with pink acrylic paint
- Color the giraffe parts in yellowish-orange acrylic paint
The Body
Paint your A4 paper with the brown acrylic paint to give your giraffe their marks. Where possible, try to paint before assembling your pieces. Paint along the neck to create brown spots too.
Head
- Paint two dots and a single stripe on your giraffe’s face
- Cut two cardboard rings
- Glue the giraffe’s googly eyes and stick the two cardboard rings to form a nose
- Glue the giraffe’s tongue
- Apply hot glue and fasten the neck on the body
- Apply hot glue on the neck and fix the head
Mane
- Pick two chenille sticks and join them together to create a long zigzag shape
- Join the zigzag structure with hot glue
Tail, Horns, and Legs
Pick one chenille stick and bend it in half. Twist the ends and leave behind a circle on the other end. Attach the end-result to the giraffe’s body to form the tail. Use another chenille stick and fix them on the head to set up the horns. For the legs, you will need to twist together brown and black chenille sticks. Glue them on the body. Your giraffe is now complete.
Talking Fish Paper Craft
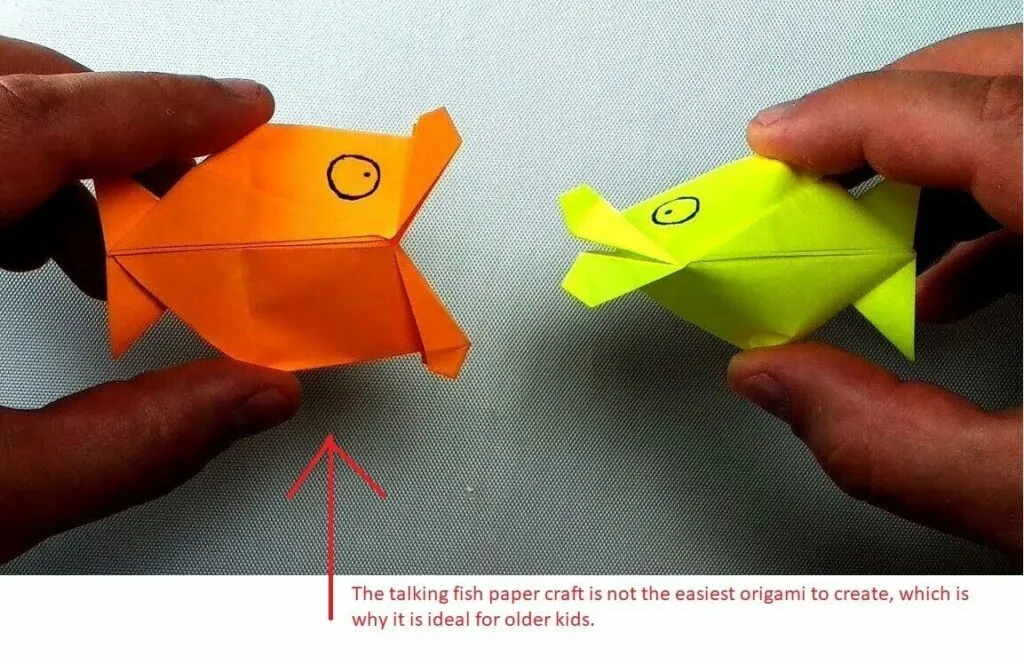
The talking fish paper craft is not the easiest origami to create, which is why it is ideal for older kids. Read on to learn how to make it.
Things you will Need
- Two googly eyes
- An A4 sheet of paper
- Scissors
- A cotton bud and white acrylic color. You will use the cotton bud to make dots on your paper fish
- Glue
Method
- Fold your A4 piece of paper to form a square and trim off the excess paper. Your folded paper should be in the form of a triangle
- Fold your triangle into half and fold it once more into two equal parts. One of these parts should be rectangular while the other should be triangular
- Unfold the bends and fold the rectangular section once more
- Make a triangle out of the rectangular part
- Create a small triangle on the same angle before opening it
- Make a tiny but long triangle
- Form a small triangle at the edge
- Unfold your paper to facilitate the assembling process
- Pick and fold two opposite edges. On each side, you want to form two long triangles
- Create a small triangle at the middle
- Fold the central part inside and pull to form a tiny triangle
- Wrinkle the square at the center
- Pick two opposite sides that have no folds and thrust them close together, leaving the square structure pressed on the inside. Confirm if everything is well-folded before folding a long triangle
Other Summer Simple Craft Ideas
Apple Print Craft
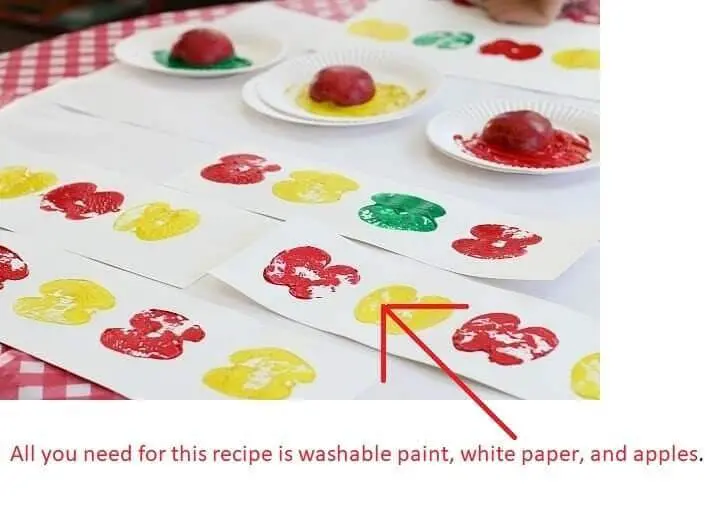
Your toddler will need an apple to create this craft. Divide the apple into half and let the kid use it to make stamps on a white paper. You can take this opportunity to teach your child about the different types of apples available. All you need for this recipe is washable paint, white paper, and apples.
DIY Repurposed Wind Chime
The repurposed wind chime is one of the best day crafts for your preschoolers.
Galaxy Slime
If you are looking for a sensory activity for your kids, then the galaxy slime should be in your to-do list. To achieve this product, add glitter to an ordinary borax-free slime. You can use a simple yet customizable recipe for kids of all ages. The kids will be happy to watch their galaxy slime glitter in the night under the moon. The salad spinner fireworks craft is also an ideal night time activity for kids.
Wooden Whistle
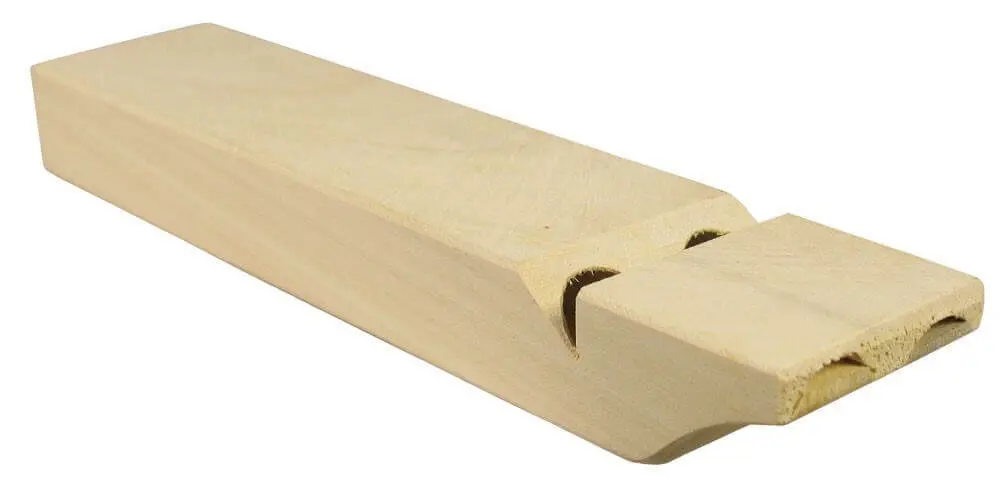
A wooden whistle is a woodcarving sensory activity that requires adult supervision. It is a fun kid’s activity that beginners will enjoy.
Paracord Bracelets
Paracord is a lightweight but durable rope used for camping and survivalist activities. There are many different paracord colors that kids can use for arts and crafts projects like paracord bracelets.
Airplane Clothespin
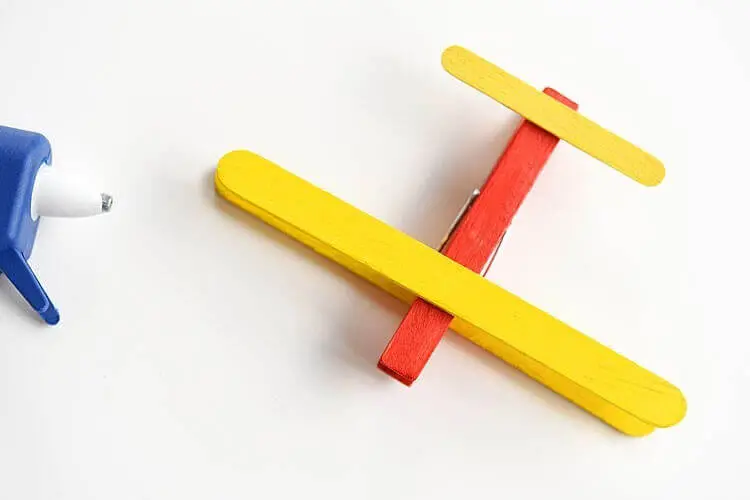
To make the airplane clothespin, you need the following:
- A pair of scissors
- Glue
- Foam craft ticks
- clothespins
Pom Pom Rainbow Collage
To make a pom pom collage you will need to cut out rainbow shapes in a cardboard tube to form the bottom of your collage. Arrange all your materials in color groups and start the gluing process. If you are working with younger kids, draw the rainbow parts on the cardboard to provide an outline of where they will glue.
Popsicle Stick Vases
The Popsicle stick vase is an ideal 4th of July craft for older kids. Try this simple technique to create a colorful piece that your loved ones will love.
Coffee Filter Butterfly
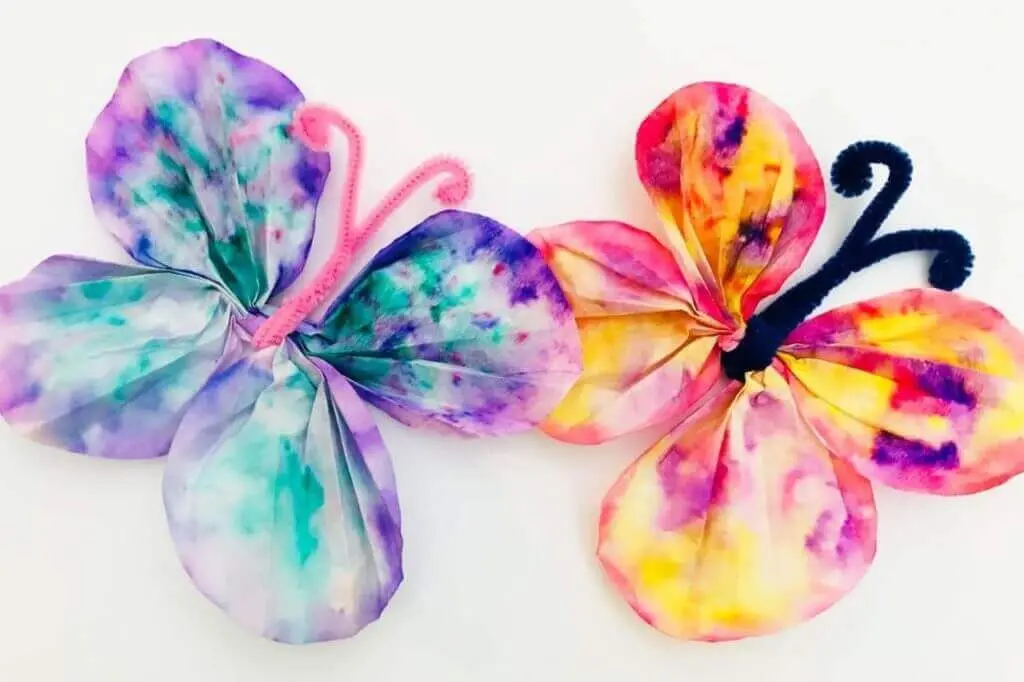
For the coffee filter butterfly, kids can use different colors to create a kaleidoscope of butterflies to display. To make coffee filter butterfly crafts, you will need a pipe cleaner, food coloring or round coffee filters, wax paper, droppers or spoons, and a spray bottle.
Simple Easter Craft Ideas
Easter is an exciting season for both kids and adults. You can use this season to bond with your kids as you create and learn different art ideas. Let us discuss some of the easy Easter craft ideas that you can help the kids do. These easy DIY art projects can also be ideal for a birthday party.
The Paper Plate Easter Chick
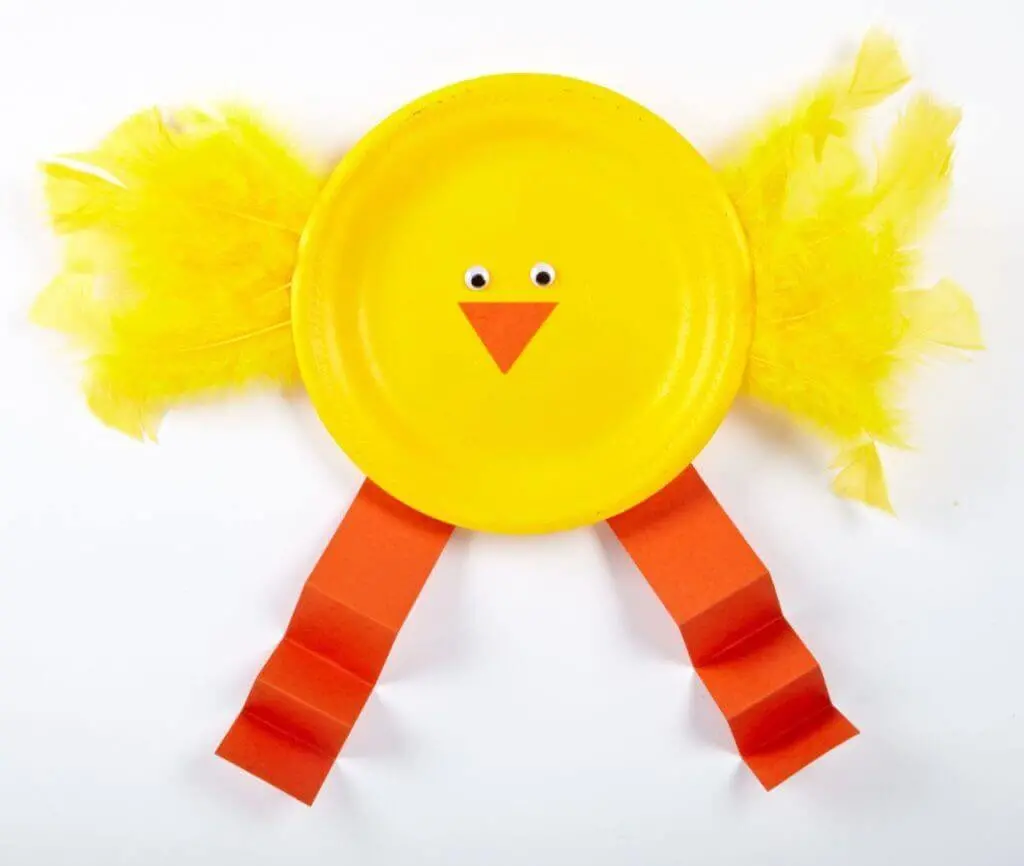
This craft idea complements the Easter season. Read on to understand how to go about creating it.
What You Will Need
- Gluestick
- Googly eyes
- Feathers
- Orange construction paper or card stock
- Yellow dessert plate
- Yellow paper plate
Method
- From your construction paper or card stock, cut two long strips that will become the chick legs. You will also need to form two tiny chick feet and a beak. Choose a small pearl or diamond for its beak.
- Begin creating the chick’s legs using the accordion style. Be sure to fold each orange paper strip. Now smear glue on the feet up to the bottom part of each leg.
- Fix the legs to the bottom part of the paper plate. To create the chick’s beak, you need to fold the section where you fixed the orange pearl or diamond into half. Make the beak, and attach it to the middle of the plate.
- Add the googly eyes and fasten some feathers at the back of your plate. Doing so gives your chicks with fluffy wings.
Printable Easter Bunny Box
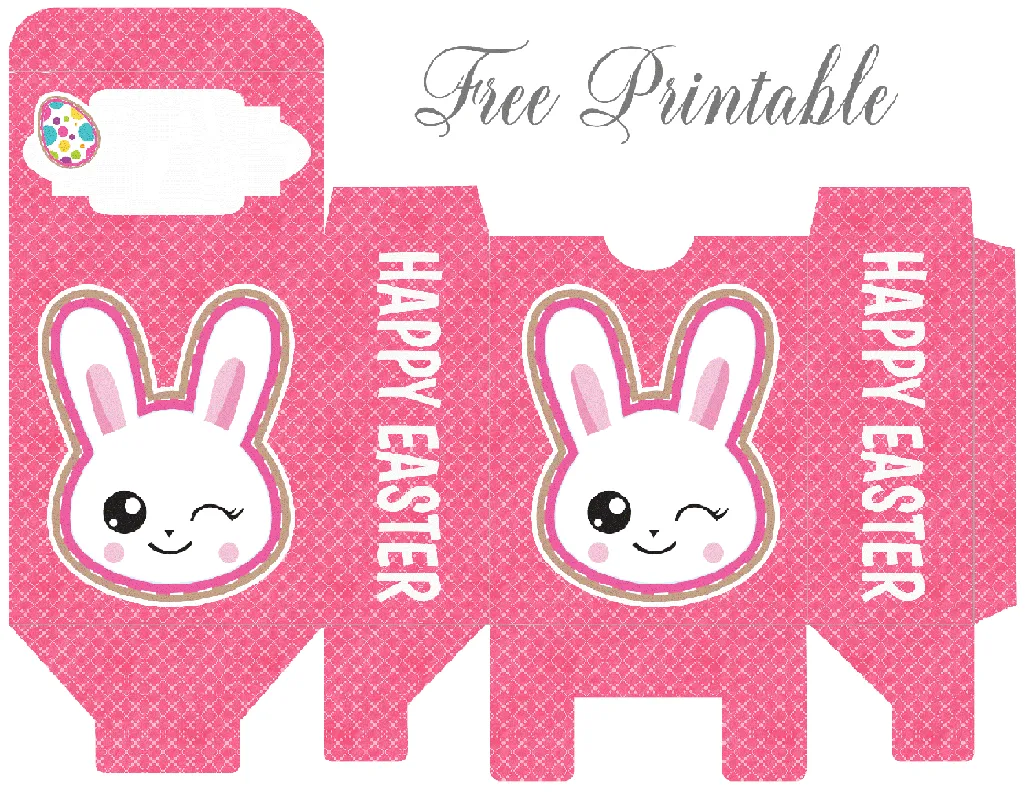
The free printable Easter bunny box can be an ideal decor addition to any Easter basket. You can use it in other events such as a spring celebration party. Here is how to make it.
Materials
- An Easter bunny box template
- Printer and computer
- Scissors
- Cardstock
- Halos mandarins
- Double stick tape
Method
- Download the Easter bunny box template and print it on cardstock
- Trim along the solid lines before creasing the box within the dotted lines
- Put a Halo at the center of the box. Fold the vertical lapels inside and the horizontal ones along the top to form a carton structure. Drive the two intertwined pieces together to form a bunny shape
- Use double-stick at the back of each earpiece to join it to each ear. Use different colors for the ears to achieve fun colors.
DIY Brown Sack Easter Masks
Brown sack Easter masks are easy to make and your kids will enjoy creating them. You can find free printable options online, but creating them is an easy kids crafting idea to keep your kids engaged. Kids can either use colored paper or exercise their creativity with different crayon colors.
Egg Shell Seed Pots
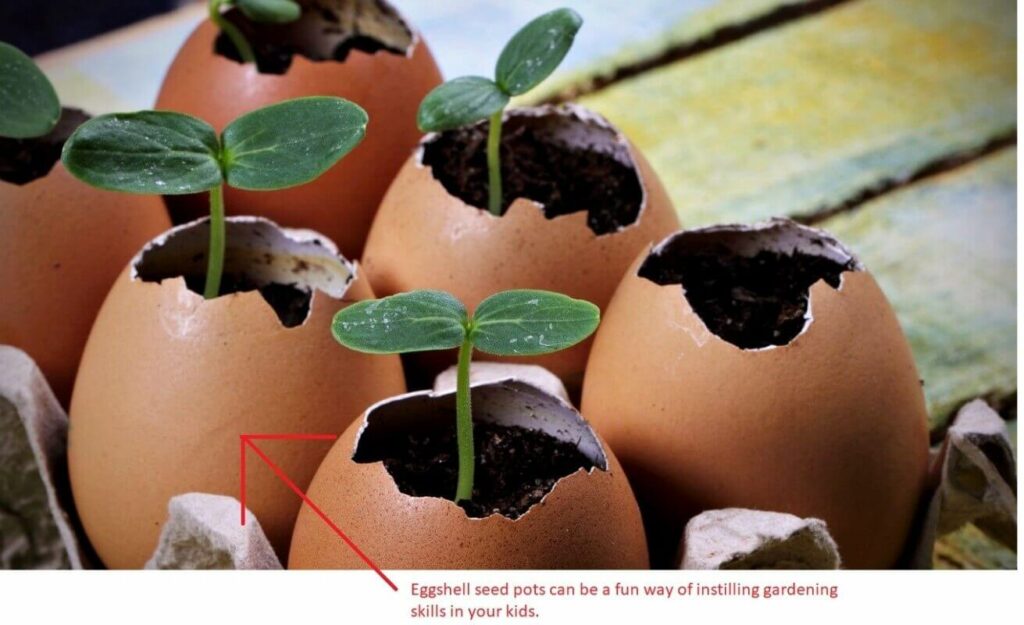
Eggshell seed pots can be a fun way of instilling gardening skills in your kids. Further, it is a cost-effective craft for kids seeing that all you need is save eggshells every time you eat eggs. Here is an easy guide to help you and the kids achieve your dream seed pots.
Salt Dough Easter Egg Garland
Salt dough Easter egg garlands can be the perfect crafts for your preschoolers. Read on to find out how to make them.
· Materials you will Need
Salt dough. For the dough, you need to mix one cup of water, a cup of salt, and two cups of flour. Remember, you will have to bake the dough, which means your kids need strict adult supervision.
- Paint brushes and acrylic paint
- A Ribbon that you will use to hang your garlands
- Mod podge
- An Egg-shaped cookie cutter
Method
Roll your salt dough to around a quarter of an inch thickness before cutting out the egg shapes
Prick the top of each egg shape to create holes. You can use a non-pointed pen for the best results
Line your shapes on parchment paper, place it on a baking sheet and bake at 200 degrees until they are dry and hard
Allow to cool down well before painting them with fun craft colors and pretty patterns. Kids can even create handprint patterns on the egg shapes depending on their size.
Allow the paint to dry before sealing with a coat of mod podge
Strap a loop through the top of your egg shapes using ribbon. Use a longer ribbon to suspend he shapes and make the garland
Hang your garland to complete this keepsake craft
DIY Father’s Day Crafts for Kids
Choosing a father’s day gift can be a difficult task, but a homemade craft can make any father feel special. There are many crafts for kids ideas that are not only simple, but they will also improve your child’s sensory skills. Here are some craft ideas that you and your kids can try for father’s day.
Personalized Grill Spatula Materials
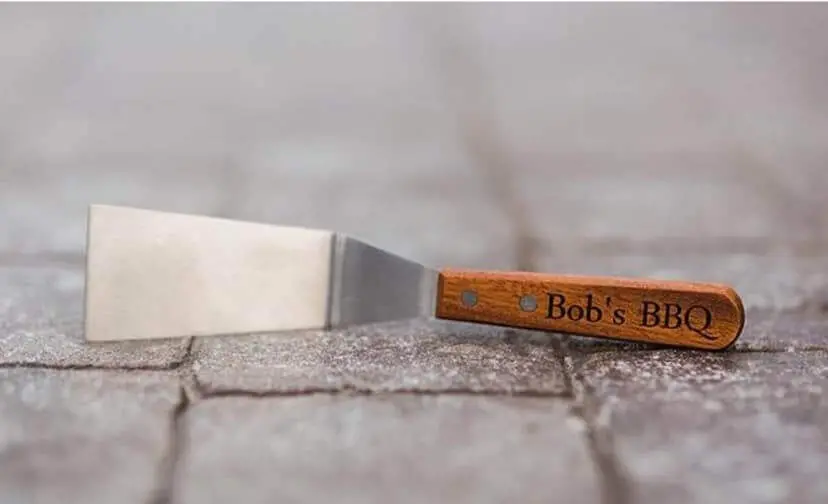
Many dads enjoy grilling with their children, especially in the afternoons during the weekend. What a better way to make their grilling sessions even more fun than a personalized spatula? To make this craft, you will need:
- A wooden-handled spatula. You can find these in your local store
- A pair of scissors
- Medium to fine sandpaper
- Foam brush
- Mod podge
- Paint pens
Method
Sand the entire wooden handle using a fine to medium sandpaper. Doing so creates the perfect background for the paint to hold fast on the handle
Use a paint pen to write your personalized message to your dad on the wooden handle. Paint pens are a good option for both kids and adults because they are not messy. Further, they are versatile, and you can use them to paint on different materials like metal, ceramic, wood, fabric, and even plastic.
Leave the paint to dry completely before adding a coat of mod podge to safeguard it.
Your personalized father’s day gift is now complete.
Tackle Box Candy or Fish Father’s Day Craft
Excite your dad with this simple and easy to make tackle box. You will need:
- A Tacklebox organizer which you can buy from the local store
- Sour gummy worms
- Sour octopus candy
- Gummy worms
- Swedish fish candy
- Free Printable tag
Method
Fill the different compartments of your box with your fish-shaped candy
Print the tag and glue it on the outer part of your tackle box. You can include a personalized message to your dad.
Tie and Dye Bookmark
Does your dad love to read? If they do, then this tie and dye bookmark will come in handy. You can even use it as a mother’s day gift. Kids will have fun experimenting with the fun and easy technique of making these accessories.
Picture Frame
Did any of your family members hit a milestone recently? It could be a graduation, a job promotion, or even a new baby. Documenting memories is one way of keeping the events fresh, and this picture frame is an ideal way of doing it. You will not need many items to create it.
DIY Tie Rack
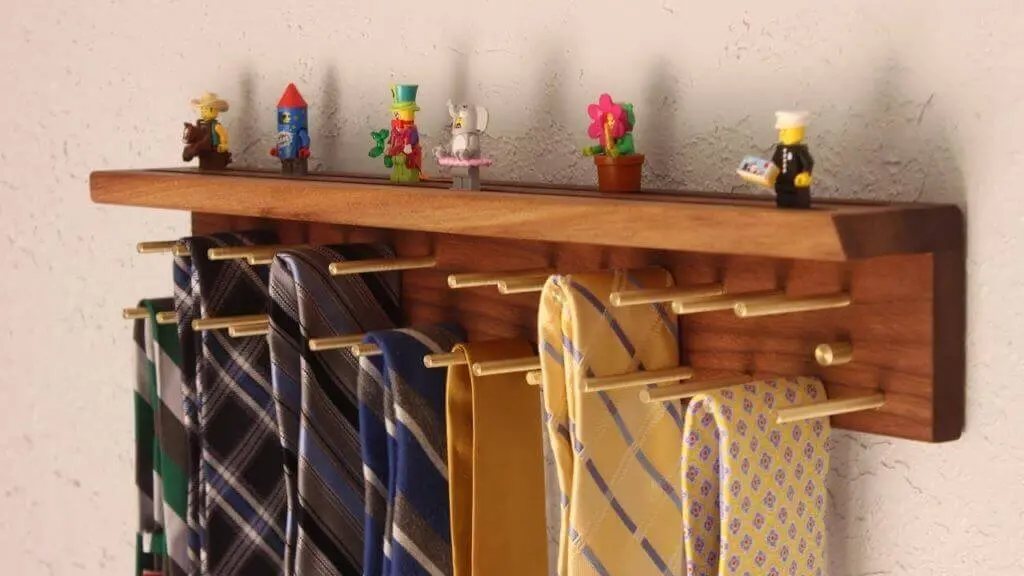
Storing ties can be a difficult task, which is why this DIY tie rack will come in handy to keep them neat and organized. This project is easy, and your kids can do it on their own but with your supervision.
Mother’s Day Easy Crafts for Kids
If you are planning to surprise your mom with a DIY craft during mother’s day, there are some options you can choose.
DIY Crayon Candle
To make a DIY crayon candle, you will need the following.
- Old Crayons
- Containers
- Wicks
- Wax
Method
- Melt the wax. The perfect way to melt your wax is to create a double boiler. You can use a pot and a coffee can. Fill your pot, up to between one to two inches with water, and simmer it. Put your wax in the coffee can and let it melt until it is clear. Use an old spatula to stir the wax.
- Reduce the heat on your burner once you achieve your desired consistency. Do not turn off the burner. You need to ensure the wax remains warm and in liquid form. Remember, creating the layers will take some time, but this craft idea will teach your kids how to be patient.
- Working with one color at a time, pour hot wax in the container with the broken crayon. You want to crush your crayons into small pieces for the best results. Stir using a craft stick and let the crayon melt. If you want a scented candle, you can add essential oils at this point.
- Put a wick inside your jar before pouring the wax inside. You do not need anything to secure your wick. Allow the wax to hold it in place. Still, you can twist it around a pencil or wooden skewer to keep it straight.
- Refrigerate your jar to set the wax. The setting process may take longer, depending on the type of wax you use. Once the layer is firm, and cool start the process, this time with a different color set of crayons. Repeat the process for all your crayon colors. When the final layer sets, your candle is ready for gifting.
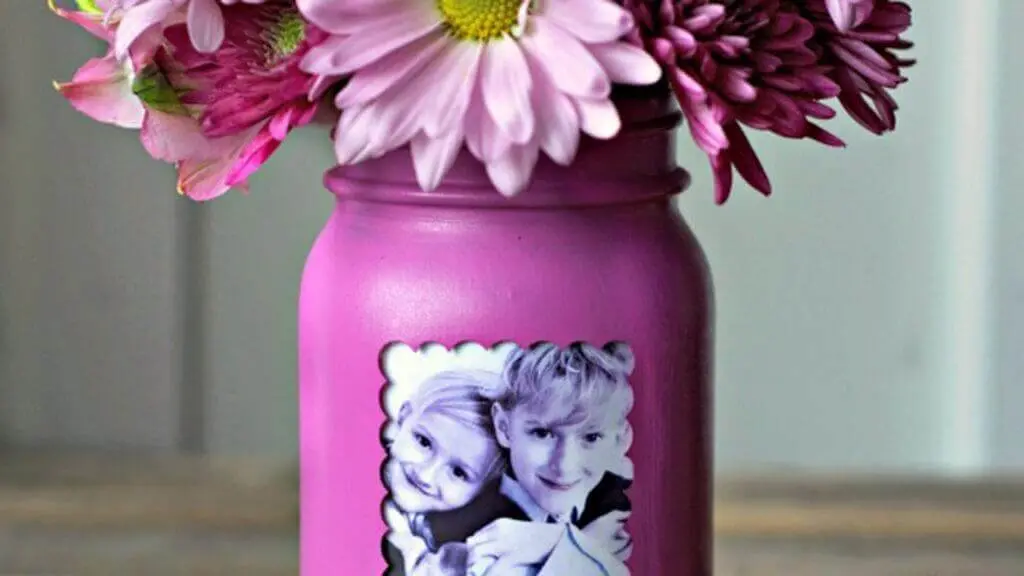
Mason Jar Picture Frame Vases
Mason jar picture frame vase is an ideal way for the kids to exercise their creativity, and a perfect mother’s day gift. The method is simple, and kids of all ages can easily do it with adult supervision. You can even make it an exciting indoor activity on a rainy day.
DIY Dots and Dashes Floral Mug
Does your mom love her coffee or tea? How about decorating her favorite cup with dots, dashes, and flowers? You can even add a personalized message to make her feel special. This dots and dashes floral mug is an ideal back to school activity and a perfect way of exercising your artistry skills.
Balsa Wood Planters
Many moms love their indoor plants. To make them feel appreciated during mother’s day, you can give them a gift that complements their passion. Making basal wood planters is an easy process that you can complete with readily available items.
Mother’s Day Paper Plate Craft
Use a paper plate as your canvas material and paint it with your mom’s favorite watercolors. You can laminate it with a clear paper bag to prolong its lifespan, and your mom can use it as a keepsake for many years.
Valentine’s Day Crafts for Kids
Often, Valentine’s Day is all about chocolates, flowers, and romance. But this does not eliminate kids from the fun. You can spend a few hours during the day helping your kids create interesting craft pieces.
There are numerous Valentine’s Day crafts for kids you can try. You can even use these ideas to make Christmas crafts. Some of the items that kids can create include; a suncatcher, pinecone mouse, and colorful sheep made of craft sticks.
Nature Crafts for Older Kids
Did you know that there are many things you and the kids can make with nature? From the hanging flower garland to the twig vase and leaf prints, nature provides ideal materials for your crafting.
All you need to create fun nature crafts for kids is natural materials like flowers, tree bark, leaves, rocks, twigs, and seashells. Many nature crafts are ideal for older children, but younger kids can also create them with adult supervision.
Arts and Crafts come with Numerous Benefits for Your Kids
The benefits of crafting extend to different aspects of life and equip kids with excellent problem-solving skills. Leverage this guide to learn various craft ideas that your kids can learn and love.